Sewing Clothes
Understanding About Fabric Grain When Sewing
Whether you are sewing for a business or sewing for a customer, it’s important to know about fabric grain. Especially when it comes to woven fabrics.
Many that are new as a seamstress/tailor aren’t aware of it and even seasoned individuals will brush it off. Understanding fabric grains is important.
Especially when sewing clothing, such as pants. For example, have you ever had a pair of jeans that constantly had one or both seams twisting towards the back or the front?

Odds are this is because the manufacturer wasn’t checking the grain of the fabric as it was being cut out. But this isn’t just with clothes, you need to watch the grain on any item that has a distinct pattern. This includes pillows, curtains, and other items.
STEPS BEFORE THE PROJECT
Being familiar with your personal sewing machine helps. Use a new needle and thread it with a color that complements the fabric.
Sewing a few scraps before getting started doesn’t hurt. If your fabric is wrinkled, iron it before starting. You want it to be as flat as possible.
FABRIC GRAIN LINE

If the fabric is woven, it’s going to have a grain line (100 Percent Cotton – For Example.) This naturally occurs as it is woven during the manufacturing.
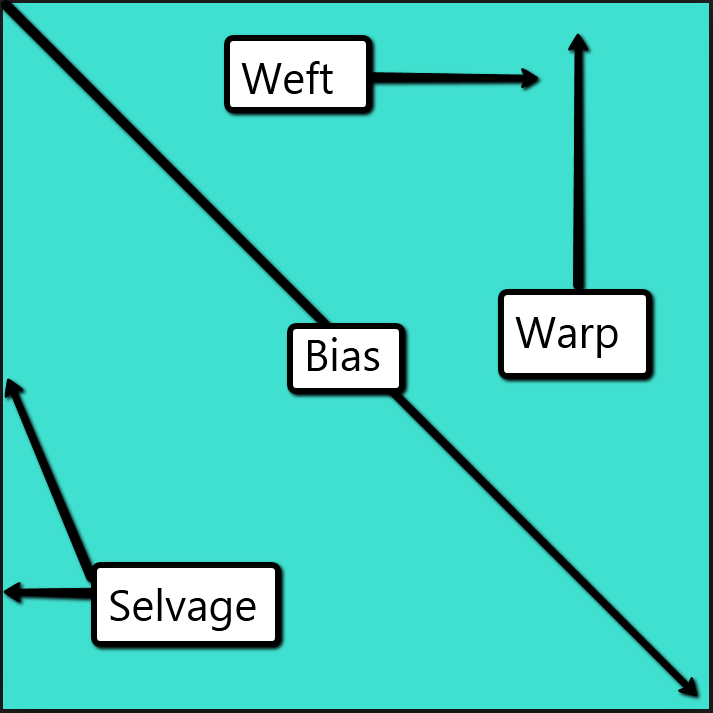
Think about a large loom and the threads are sticking out of it. These threads are forming the warp or fabric grain.
During the process of weaving, the short threads will be woven across and under the long threads. The result will be the weave of the fabric.
The threads that are shorter form what is called the “weft” or crossgrain. What’s referred to as the “bias” will stretch and is running 45 degrees across the grain.
Depending on the situation, you can cut along the bias as well. The selvage edge is going to run parallel with the grain line.
The selvage edge is the factory edge of the fabric. It will have the manufacturer’s name stamped on it.
Cut fabric has two selvage edges – one of them displays the manufacturer’s information but the other matches the fabric.
Stretching Along The Selvage (Below)

The strongest threads are the grain lines of the woven piece, and most of the time you need the pattern running along those lines. This makes for sturdier clothing or whatever the item will be.
If you pull the fabric along the grain line (selvage) you will notice there isn’t much stretch at all. But when pulling across the crossgrain, which is the edge they should cut at the store, you will see that it gives a little.
Stretching Along The Crossgrain (Below)

Last of all, when pulling along the bias, you find it has the most amount of stretch. If you ignore the grain of the fabric, you possibly will cut it on the bias.
Doing so will give way to puckering and unwanted stretching; thus the project will fit incorrectly and hang funny.
Stretching Along The Bias (Below)

Again, you want to cut along the selvage or crossgrain first – if the option is there. The bias can be cut, but it’s not the best option for many applications.
Knowing your fabric grains are important – you don’t want the seams to twist but instead stay in the position you meant when sewing them.


