Sewing For Beginners
Sewing Seams: Techniques and Best Practices
Ever sewn a seam that just wouldn’t behave? Maybe it puckered, stretched, or just plain fell apart? Trust me, I’ve been there, and it’s beyond frustrating! But here’s the good news—once you master a few essential techniques and best practices, sewing seams becomes a whole lot easier (and way more fun).
Read More About Sewing Seams: Techniques and Best Practices
The Foundation of a Great Seam
If you want strong, clean seams, you’ve gotta start with the basics. That means choosing the right fabric, thread, and needle for your project. A heavy denim needs a sturdy needle and thick thread, while delicate chiffon calls for a fine needle and lightweight thread. Ignore this step, and you’ll find yourself battling skipped stitches, broken thread, or worse—holes in your fabric. (Ask me how I know)
Seam Allowance: Don’t Guess It, Measure It
Seam allowance is the extra fabric between the stitching line and the fabric edge. Get this wrong, and your project may end up too tight, too loose, or just plain wonky. Most patterns call for a 5/8″ seam allowance, but double-check because some (especially in quilting or bag-making) use different measurements.
A tip? Mark your seam allowance on your machine with a strip of painter’s tape. It’s a lifesaver for keeping stitches straight.
More Things to Know About Sewing Seams: Techniques and Best Practices
Stitch Length: The Goldilocks Principle
Stitch length is like porridge—not too long, not too short, but just right. A basic stitch length (about 2.5mm) works for most projects, but adjusting it can make a huge difference. Shorter stitches (1.5-2mm) are perfect for delicate fabrics, while longer stitches (3-4mm) work well for basting or thicker materials.
I once tried sewing a thick canvas bag with a tiny stitch length—let’s just say my machine wasn’t happy, and neither was I.
Pressing: The Secret Sauce of Sewing Seams
If you’re skipping the pressing step, I hate to break it to you, but your seams aren’t reaching their full potential. Pressing (not ironing—there’s a difference!) sets stitches and makes everything lie beautifully flat. Whether it’s pressing open or to one side, this little extra step is the difference between homemade and handmade.
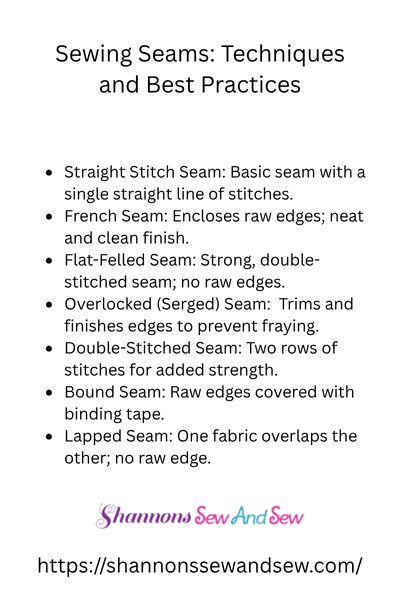
Seam Finishes: No More Frayed Edges
Seam finishes aren’t just about looks—they prevent fraying and help your project last longer. Here are a few of my favorites:
- Zigzag stitch – Quick and easy for stopping fraying.
- French seams – Perfect for delicate fabrics where raw edges need to disappear.
- Serger/overlock – A pro finish that seals the deal (literally).
- Pinked edges – If you’re in a hurry, pinking shears do the trick for lightweight fabrics.
Stretch Fabrics: Keeping Seams from Popping
If you’ve ever heard that awful “snap” sound after pulling on a stretchy garment, you know the pain of using the wrong stitch. Regular straight stitches won’t cut it for knits—you need a zigzag or a stretch stitch to keep those seams flexible.
Oh, and use a ballpoint needle! It slides between the fibers instead of piercing them, preventing skipped stitches and holes. I learned that the hard way after wrecking my favorite jersey tee.
Curved Seams: Taming the Trickiest Stitches
Sewing curves can feel like wrestling an octopus, but a few tricks make it easier. First, go slow—rushing leads to jagged stitches. Second, clip or notch the seam allowance after sewing to help the curve lay flat. Trust me, your garments will thank you.
Final Touches: Reinforce Where It Matters
Some seams take a beating—underarms, crotches, pockets. If you don’t reinforce these, you might find yourself in an embarrassing situation (ask me about the time my jeans ripped in public…). A quick backstitch at the beginning and end of high-stress seams works wonders. For extra durability, a second row of stitching can’t hurt either.
Sewing Seams Like a Pro
Now that you’ve got the inside scoop, sewing seams should feel less like a mystery and more like an exciting challenge. Whether you’re crafting a sturdy pair of jeans or a flowy dress, using the right techniques will make your seams stronger, neater, and frustration-free.
So, what’s your biggest struggle with sewing seams? Let’s chat in the comments—I’d love to help.

Beginners Guide to Setting Up Your Sewing Machine

How to Sew a Drawstring Bag: Beginner Project

How to Sew a Shirred Garment with Elastic Thread

Sewing Smocked Garments: Techniques and Tips

How to Sew a Basic Fabric Coaster for Beginners

Sewing Tunic Tops and Dresses: Styles and Patterns

Sewing Pleated Garments: Techniques and Styles

How to Sew a Peplum Top or Dress

Sewing Formal Wear: Gowns, Tuxedos, and Suits

Sewing Basics for Men’s Clothing: Shirts, Pants, and Jackets

Sewing with Lace: Techniques for Clean and Elegant Finishes

How to Sew a Professional Waistband on Skirts and Pants

Sewing Winter Accessories: Hats, Gloves, and Scarves

Sewing with Sheer and Lightweight Fabrics

Sewing Sustainable Fashion: Upcycling and Repurposing Textiles

Sewing Vintage-Inspired Clothing: Patterns and Techniques

Sewing Costumes for Cosplay, Theater, and Special Events

Sewing Adaptive and Inclusive Clothing for Various Needs

Sewing Children’s Clothing: Patterns, Sizing, and Tips
