Sewing Tips
Sewing Curved Seams: Tips for Smooth Results
If you’ve ever tried to sew a curved seam, you know it can be tricky. Sewing curved seams: tips for smooth results is exactly what you’ll need to tackle this sewing challenge and make your project look as polished as a pro’s. Whether you’re working on a garment, a bag, or just getting creative, smooth curves are essential to creating neat, professional-looking results.
Read More About Sewing Curved Seams: Tips for Smooth Results
My First Curved Seam Experience
I remember the first time I attempted to sew a curved seam. It was on a simple skirt project, and I thought I could just follow the straight line like usual—wrong! The fabric keeps bunching up, and the seam has a wonky, uneven finish. I was frustrated, to say the least. But after a bit of trial and error (and a few choice words), I finally got the hang of it. So, let me share what I learned and how you can sew those pesky curved seams with ease.
More Things to Know About Sewing Curved Seams: Tips for Smooth Results
Understanding Curved Seams
A curved seam, unlike a straight seam, follows a rounded shape and requires a bit more finesse. You might be working on a sleeve cap, a collar, or even a simple curved hem. Curved seams can challenge even seasoned sewists, but with the right approach, you’ll be able to handle them like a pro.
1. Choose the Right Fabric
The first tip I have for you is fabric choice. Not all fabrics play well with curves. For beginners, I recommend working with lighter to medium-weight fabrics like cotton or linen. These fabrics have just enough structure to hold their shape without being too stiff. Heavy fabrics like denim can be more challenging, especially for tight curves, and might need a little extra muscle.
On the flip side, slippery fabrics like satin or silk can be a nightmare for curves. They slide around too easily, making it difficult to keep the fabric in place. If you’re working with these fabrics, try using a walking foot to keep everything aligned.
2. Pinning is Your Best Friend
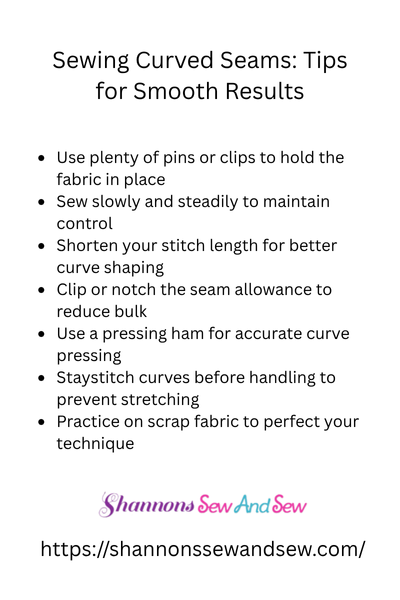
It’s tempting to skip this step, but trust me—pinned curves are a game changer. I used to think, “Oh, I’ll just hold it in place and sew carefully.” But that never ended well. Pinning the fabric every couple of inches along the curve will keep everything where it needs to be. When you’re pinning, make sure the pins are perpendicular to the seam line. This way, they’ll be easy to remove as you sew.
Also, don’t forget to match the notches (if your pattern has them). They’re there to help you line up the curve, so use them.
3. Use a Smaller Stitch Length
When you sew curved seams, it’s helpful to reduce your stitch length. A shorter stitch allows for more control, especially around tight curves. If the stitches are too long, they won’t curve as smoothly and can lead to puckering. I typically adjust my machine to a length of around 2.0mm when working on curves, but this can vary depending on your fabric and machine. It’s worth experimenting to see what works best for your project.
4. Sew Slowly and Steadily
This might sound like a no-brainer, but sewing slowly is key when you’re working on curved seams. I know the temptation to rush, but trust me, slow and steady wins the race. Take your time and guide the fabric with your hands, allowing the machine to do the work. Use the handwheel on your sewing machine when you get near the curve—this gives you even more control.
As you sew, try to keep the fabric as smooth as possible without pulling or stretching. A little bit of tension can ruin the flow of the curve, so gentle handling is crucial.
5. Snip and Clip for Better Results
Here’s a trick I wish I knew earlier: clipping the seam allowances. Once you’ve sewn your curve, it’s a good idea to clip into the seam allowance every half-inch or so. This helps the fabric bend and shape better, especially around tight curves. Just be careful not to cut too close to your seam—about 1/8 inch away is perfect.
For even tighter curves, you might need to clip more frequently. This will allow the fabric to lay flat without bunching up. It might seem like an extra step, but the results are totally worth it.
6. Pressing is Key
After sewing your curved seam, pressing it is a must. It might feel like an optional step, but believe me, pressing is essential for getting smooth curves. Use the appropriate heat setting for your fabric and press along the curve gently. Don’t pull or stretch the fabric while pressing—just let the steam do its job.
If you’re working with delicate fabrics or tighter curves, you can use a tailor’s ham to press the seam, which will give you a more rounded, professional finish.
Sewing Curved Seams: The Bottom Line
In the end, sewing curved seams is all about patience and practice. But once you get the hang of it, it’ll feel as natural as sewing a straight line. Keep these tips in mind, and you’ll be sewing those smooth curves in no time. So grab your fabric, get your pins ready, and get excited about those curves.
Closing Thoughts: Mastering Curved Seams
Sewing curved seams: tips for smooth results might sound intimidating at first, but with these tricks up your sleeve, you’ll be able to tackle even the trickiest of curves. Don’t get discouraged if it takes a few tries to perfect your technique. Every seam you sew makes you a little bit better, and soon, curved seams will be second nature. Keep sewing, keep practicing, and enjoy the process.

Beginners Guide to Setting Up Your Sewing Machine

How to Sew a Drawstring Bag: Beginner Project

How to Sew a Shirred Garment with Elastic Thread

Sewing Smocked Garments: Techniques and Tips

How to Sew a Basic Fabric Coaster for Beginners

Sewing Tunic Tops and Dresses: Styles and Patterns

Sewing Pleated Garments: Techniques and Styles

How to Sew a Peplum Top or Dress

Sewing Formal Wear: Gowns, Tuxedos, and Suits

Sewing Basics for Men’s Clothing: Shirts, Pants, and Jackets

Sewing with Lace: Techniques for Clean and Elegant Finishes

How to Sew a Professional Waistband on Skirts and Pants

Sewing Winter Accessories: Hats, Gloves, and Scarves

Sewing with Sheer and Lightweight Fabrics

Sewing Sustainable Fashion: Upcycling and Repurposing Textiles

Sewing Vintage-Inspired Clothing: Patterns and Techniques

Sewing Costumes for Cosplay, Theater, and Special Events

Sewing Adaptive and Inclusive Clothing for Various Needs

Sewing Children’s Clothing: Patterns, Sizing, and Tips
