Sewing For Beginners
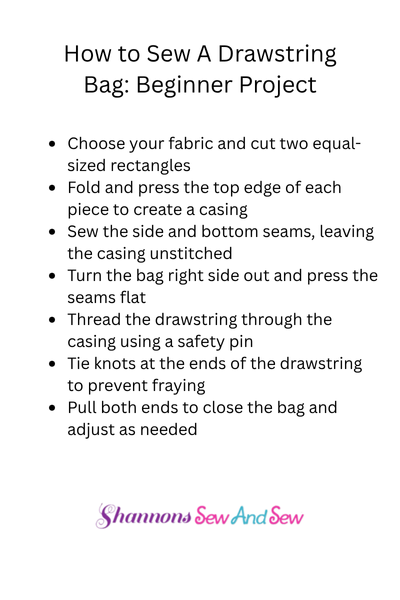
How to Sew a Drawstring Bag: Beginner Project
If you’ve been wondering how to sew a drawstring bag: beginner project style, you’re in the right place. You don’t need a fancy sewing machine or years of experience to whip up something cool and useful. Honestly, if you can sew a straight-ish line and you know how to tie a knot, you’re already halfway there.
So grab that cup of coffee (or energy drink, no judgment), and let’s make a drawstring bag together.
Read More About How to Sew a Drawstring Bag: Beginner Project
Why I Love This Beginner Sewing Project How to Sew a Drawstring Bag: Beginner Project
Let me tell you a quick story. The first time I tried sewing a drawstring bag, I was actually trying to make a wine bottle cozy. I didn’t measure right, ended up with something that looked more like a deflated pillowcase, but hey—it had a string! And it worked. I was hooked. There’s something about threading that final string through and cinching it tight that just feels like a little victory.
The cool thing about learning how to sew a drawstring bag: beginner project style is that it gives you instant results. No months-long commitment. No stress. And the end result? A bag you can actually use for gym gear, snacks, cords, toiletries—whatever needs to be tucked away and towed around.
More Things to Know About How to Sew a Drawstring Bag: Beginner Project
What You’ll Need (and What You Probably Already Have)
This is one of those projects that doesn’t demand much. You can raid your closet for an old button-down shirt, snag some ribbon or paracord from your garage, and you’re golden.
You’ll need:
- Fabric (something not too thick—cotton is perfect)
- Thread
- Ribbon, twill tape, or cord for the drawstring
- Safety pin or bodkin
- Scissors
- Pins or clips
- A sewing machine (but hand-sewing works if you’re patient)
You don’t need to break the bank. I’ve made bags from old T-shirts and even a pair of pajama pants I accidentally shrunk.
Let’s Talk Size and Simplicity
When it comes to how to sew a drawstring bag: beginner project, simple is the name of the game. You can start with a 12” x 18” rectangle, fold it in half, and you’re halfway to a finished bag. I like to add a little seam allowance—about ½ inch all around—so you’re not working right up to the edge.
You sew the sides, leave a gap near the top for the drawstring channel, fold the top edge down twice, stitch it, and then thread the string through. Done. Seriously. That’s it.
The Trickiest Part (And It’s Not That Tricky)
The biggest “gotcha” moment for most people learning how to sew a drawstring bag: beginner project style is that channel for the drawstring. If you forget to leave a little hole on each side, you’ll be kicking yourself when you try to thread the string later.
Here’s the move: when you fold over the top to make that channel, double-fold it—once ¼ inch, then again about an inch—and sew all the way around. But don’t sew the side seams up past that channel! You want that little tunnel clear.
Threading the drawstring through can be weirdly satisfying. Just attach a safety pin to the end of your cord and scoot it through like a tiny worm finding its way out of a maze. I like using old hoodie cords—they’re sturdy and add a bit of character.
Make It Yours
Once you’ve got the basics down, this is the part where you can start customizing. Want a boxed bottom so it can stand up on its own? Easy tweak. Want to add a pocket? Go wild. Prefer Velcro? Sure, rebel a little.
The best part about figuring out how to sew a drawstring bag: beginner project and all is that it’s like a gateway craft. Before you know it, you’ll be hemming pants, whipping up tote bags, or making weirdly specific pouches for every gadget you own.
Wait—Can I Really Do This?
Yes. You absolutely can. I’ve had burly guys in motorcycle jackets at local craft nights nervously ask, “So uh… how do I thread this bobbin again?” Ten minutes later, they’re laughing, stitching away, and bragging about their new custom tool bag.
Sewing is for everyone, no matter your vibe, age, or experience. If your first bag turns out lopsided? That’s called character. It’s handmade. It’s yours. And it works.
Beginner’s Guide to Making a Drawstring Bag From Scratch
So there you have it. How to sew a drawstring bag: beginner project from start to finish—no fluff, no pressure, just fun. It’s a great way to dive into sewing without feeling overwhelmed. Plus, you end up with something useful and maybe even a little stylish.
Give it a shot. You’ll learn something, you’ll feel proud, and who knows—you might just find your new favorite hobby.
And if your first try ends up as a weird-looking hat? Wear it proudly. You made that thing.

Beginners Guide to Setting Up Your Sewing Machine

How to Sew a Drawstring Bag: Beginner Project

How to Sew a Shirred Garment with Elastic Thread

Sewing Smocked Garments: Techniques and Tips

How to Sew a Basic Fabric Coaster for Beginners

Sewing Tunic Tops and Dresses: Styles and Patterns

Sewing Pleated Garments: Techniques and Styles

How to Sew a Peplum Top or Dress

Sewing Formal Wear: Gowns, Tuxedos, and Suits

Sewing Basics for Men’s Clothing: Shirts, Pants, and Jackets

Sewing with Lace: Techniques for Clean and Elegant Finishes

How to Sew a Professional Waistband on Skirts and Pants

Sewing Winter Accessories: Hats, Gloves, and Scarves

Sewing with Sheer and Lightweight Fabrics

Sewing Sustainable Fashion: Upcycling and Repurposing Textiles

Sewing Vintage-Inspired Clothing: Patterns and Techniques

Sewing Costumes for Cosplay, Theater, and Special Events

Sewing Adaptive and Inclusive Clothing for Various Needs

Sewing Children’s Clothing: Patterns, Sizing, and Tips
