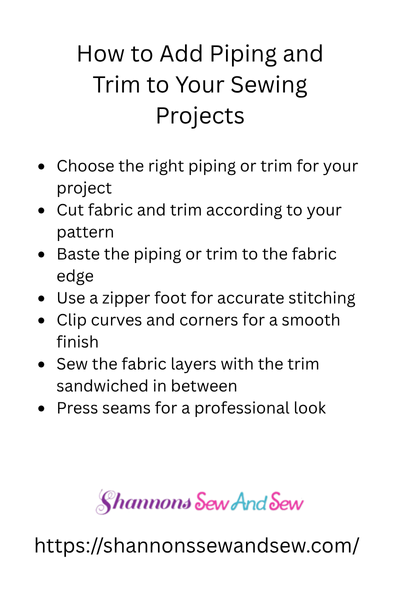
Sewing Tips
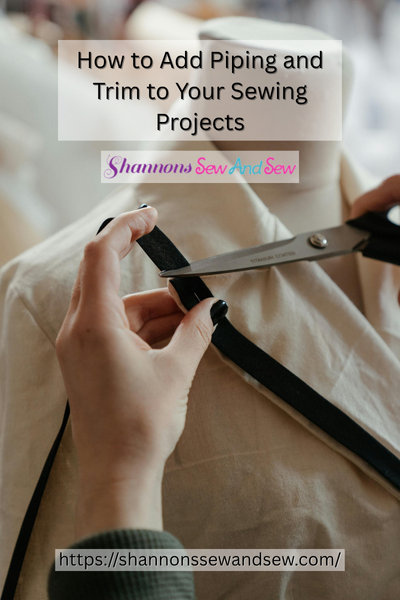
How to Add Piping and Trim to Your Sewing Projects
So, you want to know how to add piping and trim to your sewing projects? Awesome choice. It’s one of those little touches that takes your work from “hey, nice” to “wait—did you make that?!” I still remember the first time I added piping to a cushion cover. I thought I was basically a sewing genius (spoiler: I sewed it inside out the first time, but we’re not here to judge).
Let’s break it down together, shall we?
Read More About How to Add Piping and Trim to Your Sewing Projects
Why Bother with Piping and Trim?
Honestly, there was a time when I thought trim was just for fancy curtains and vintage dresses. But oh boy, was I missing out. Adding piping and trim can completely change the vibe of your project. It’s like framing your art—it gives your piece definition, structure, and that polished look people always rave about.
If you’re into making your stuff look clean and pro (who isn’t?), learning how to add piping and trim to your sewing projects is totally worth it.
More Things to Know About How to Add Piping and Trim to Your Sewing Projects
Piping: Not Just a Fancy Word
I get it—piping sounds like it belongs in a pastry kitchen. But in the sewing world, it’s a narrow strip of fabric (usually with a cord inside) that you insert into seams for definition. It’s sneaky in a good way—subtle, yet impactful.
Now, when I first tried adding piping to a tote bag, I won’t lie, I was a little intimidated. But once you do it a couple of times, you’ll be hooked. Trust me. The trick is basting it first. I know, basting feels like an annoying extra step, but it saves you from a piping disaster—like uneven corners or that dreaded “it’s shifting!” moment under the presser foot.
Trim Is Like Seasoning—Use It Well
Whether it’s rickrack, lace, or fringe, trim can totally transform a plain project into something that pops. Want to jazz up a pair of pajama pants? Add some contrast trim to the cuffs. Tired of your plain apron? Throw on some piping and a bold bias tape edge—bam, it’s suddenly Pinterest-worthy.
One thing I’ve learned? Less is usually more. If you’re adding a crazy print and neon fringe and pom-pom trim… well, that might be a little much unless that’s exactly the vibe you’re going for (and hey, no shame if it is!).
Tools You’ll Actually Use
Okay, let’s talk gear. When learning how to add piping and trim to your sewing projects, you don’t need a whole new sewing machine or anything fancy. But here’s what helps:
- A zipper foot (game changer for piping)
- Fabric glue or double-sided tape (for trim that likes to wiggle)
- Pins or clips (because piping will try to escape)
Also, if you can, press as you go. I know pressing feels like the broccoli of sewing—kind of boring—but it really does make your trim and piping lay flatter and behave better.
What Projects Should You Start With?
I’d say cushions, tote bags, and aprons are the perfect practice grounds. Low-pressure and super forgiving. Plus, once you get the hang of adding piping around corners, you’ll feel like you’ve leveled up. And if you mess up? Eh, it’s just a practice project—cut yourself some slack.
One time I tried piping on a hoodie neckline. Was it a good idea? Not really. Did I learn something? Yep. Now I know necklines are tricky and slippery and better left until you’re ready to fight fabric with ninja precision.
Tips I Wish Someone Had Told Me
Here’s the stuff that made me want to chuck my project across the room—so hopefully, you don’t have to go through the same:
- Always cut your piping fabric on the bias (unless you like wrinkly seams).
- Pre-wash your trim if your fabric is going in the wash later. Shrinkage is real.
- Start and end your piping on a straight edge, not a curve. It’s way easier to hide the join.
- Match your thread to your piping if you’re new. It’ll hide the wobbles.
Seriously, these little tips changed everything for me.
A Word About Color and Contrast
Don’t be afraid to go bold. Adding piping in a contrasting color can highlight seams in such a cool way. I once made a denim apron with red piping—it looked so sharp I had people asking where I bought it. That never gets old.
And trim? Same deal. Sometimes I match it to the fabric for a subtle vibe, other times I go wild with color. It’s kind of like accessorizing an outfit—you can let your personality shine.
Transform Your Sewing Projects With a Touch of Trim and Piping
Look, how to add piping and trim to your sewing projects doesn’t have to be complicated. It’s just one more tool in your sewing toolbox. And honestly, it’s one of the most satisfying ones. The transformation is immediate. You go from “meh” to “masterpiece” with just a little corded fabric or decorative edge.
So next time you’re finishing up a project, ask yourself—what would happen if you added a little piping? A fun trim? I dare you to try it. You might just fall in love with the results.
And hey, if you mess up? That’s part of the fun. You’re learning, experimenting, and getting better every time.
Got questions? Tried piping and hated it? Let me know—I’ve probably been there too.

Beginners Guide to Setting Up Your Sewing Machine

How to Sew a Drawstring Bag: Beginner Project

How to Sew a Shirred Garment with Elastic Thread

Sewing Smocked Garments: Techniques and Tips

How to Sew a Basic Fabric Coaster for Beginners

Sewing Tunic Tops and Dresses: Styles and Patterns

Sewing Pleated Garments: Techniques and Styles

How to Sew a Peplum Top or Dress

Sewing Formal Wear: Gowns, Tuxedos, and Suits

Sewing Basics for Men’s Clothing: Shirts, Pants, and Jackets

Sewing with Lace: Techniques for Clean and Elegant Finishes

How to Sew a Professional Waistband on Skirts and Pants

Sewing Winter Accessories: Hats, Gloves, and Scarves

Sewing with Sheer and Lightweight Fabrics

Sewing Sustainable Fashion: Upcycling and Repurposing Textiles

Sewing Vintage-Inspired Clothing: Patterns and Techniques

Sewing Costumes for Cosplay, Theater, and Special Events

Sewing Adaptive and Inclusive Clothing for Various Needs

Sewing Children’s Clothing: Patterns, Sizing, and Tips
